
Assumptions
Writing this guide I made few assumptions about potential audience. I assumed you:
- have a Hyper-V server set up with a basic virtual switch and internet connection available through the switch
- know how to create a basic VM using GUI or PowerShell
- know basic Linux commands and have knowledge how to navigate through directories, create files, use nano or another terminal file editor, and execute basic admin tasks etc.
If there is a command you don’t understand, it’s best to do a quick internet search for it.
Through the guide I will provide links for more information about some commands that were used.
Pre-Install Notes
Set up Hyper-V VM for Arch
First set up a basic Hyper-V Generation 2 VM, the reason for generation 2 is to have access to UEFI firmware.
For this guide I’ve used following basic settings:
- Generation 2 VM
- Memory: 1024MB (non-dynamic)
- Processor: 2 vCPUs
- Disk: 30GB VHDX file
- Network adapter: vSwitch
- Secure Boot: disabled
- Checkpoint: disabled
- Integration services: Left as standard, guest services unchecked
- Arch ISO mounted to DVD drive, set to Boot from DVD
Once it’s set up, start it up.
Install Notes

Official guide can be found here: https://wiki.archlinux.org/index.php/installation_guide
Confgiure the underlying system before install
Set root password, SSH and check network
To speed up the install, it is a good idea to setup SSH access to the VM after booting into ‘live’ DVD. That way you can copy and paste commands and text easily into the console.
First set password on root account using
passwd
Then start ssh service
systemctl start sshd
Since this is a VM, we don’t have to worry about setting up a wireless connection. I will cover that in a separate guide. Tip: try ‘wifi-menu‘ if you have to use wireless.
Find IP address of the VM, you can use:
ip a
If you know the subnet you are using, you can use following command to get single line output with the IP address.
ip a | grep -w 192
or ‘inet’ to get any IPs on any adapters assigned
ip a | grep -w inet
More info about grep: https://linux.die.net/man/1/grep
Once you have IP for the VM, go to a computer with SSH enabled terminal/console and login to the VM using ‘root’ as username and password you have setup previously, example:
ssh [email protected]
Setting keyboard layout
Arch by default has US keyboard layout enabled, but you can easily change it by using ‘loadkeys’ command. If like me you use UK keyboard you can do following:
loadkeys i386/qwerty/uk.map.gz
For other keyboard mappings you can navigate through folders under ‘i386’ to find the right one.
Verify the boot mode supports EFI. This will display list of files that will confirm EFI support.
ls /sys/firmware/efi/efivars
Update system clock:
timedatectl set-ntp true
and then use ‘date‘ to check show date and time
Partitioning
WARNING: fdisk will completely remove any data on your disk, so be careful if you are working on a system that contains any data.
For the VM I am using a 30GB vDisk, which will be partitioned in following way:
/boot - 300MB
[SWAP] - 2GB
/ - ~27GB
/boot partition will be used to store info needed to start the system, recommended size is between 256-512MB.
SWAP – for such a small VM, I use double the RAM space. More info on SWAP here: https://wiki.archlinux.org/index.php/Swap
/ aka ‘root’ partition, I will use rest of the 30GB vDisk for it.
On a larger system, with 512GB disk space for example, this space could be split into two partitions. One for ‘root’ (e.g. 100GB of space) and ‘/home’ partition that would occupy remaining disk space.
To find your drive letter (‘x’ in ‘sdx’) use:
lsblk
#or
fdisk -l
In my case, this is ‘sda’.
Start fdisk to format the disk.
fdisk /dev/sda
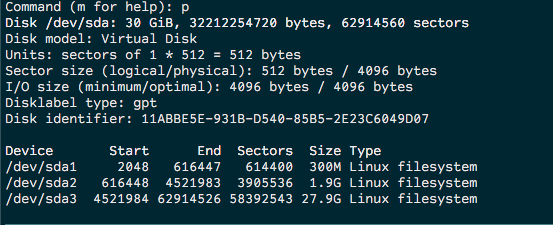
fdisk is operated using single characters and numbers – e.g. to bring help menu you can just press ‘m‘.
More info about fdisk: https://wiki.archlinux.org/index.php/Fdisk
You can check if there are any existing partitions on the disk by pressing ‘p‘. If any partitions are present you can delete them using ‘d‘, or using ‘g‘ to create completely new empty GPT partition table.
If your disk is using anything other than GPT, re-format it as GPT.
Create new partitions according to your needs by pressing ‘n‘, then:
For partition number – accept default
First sector – accept default
Last sector – this will determine the size of your partition. You can specify size using following:
‘+100G’ – which will add 100GB of space counted from the first sector
‘+300M’ – would create 300MB partition, etc…
By accepting default ‘last sector’ the remaining of the disk space will be allocated to that partition.
Once you specify ‘last sector’ you will get a confirmation:
“Created a new partition 1 of type ‘Linux filesystem’ and of size 300MiB”
Repeat it for the rest of partitions needed.
Change partition type. You can then use ‘t‘ to change partition type for each partition.
Use ‘L‘ to list all partition types available.

NOTE: Remember to hit ‘w’ to write partitions to the disk before you quit fdisk!
Format partitions to a specific file system:
mkfs.fat -F32 /dev/sda1

mkswap /dev/sda2
swapon /dev/sda2

mkfs.ext4 /dev/sda3
Mount partitions
Now we can mount created partitions in preparation for installing Arch OS.
Mount root partitions first:
mount /dev/sda3 /mnt
Then create and mount boot partition
mkdir /mnt/boot
mount /dev/sda1 /mnt/boot
use ‘df’ to show mounted partitions. You can extend this command further to show type of partitions: ‘df -Th’
Download and install Arch on mounted root partition
Update mirror list
Arch install comes with populated mirror list, however you can update it with the best mirrors for your location. A mirror list can be generated using this page: https://www.archlinux.org/mirrorlist
I’ve generated a following list for UK mirrors:
##
## Arch Linux repository mirrorlist
## Generated on 2019-06-07
##

## United Kingdom
#Server = http://archlinux.uk.mirror.allworldit.com/archlinux/$repo/os/$arch
#Server = https://archlinux.uk.mirror.allworldit.com/archlinux/$repo/os/$arch
#Server = http://mirror.bytemark.co.uk/archlinux/$repo/os/$arch
#Server = https://mirror.bytemark.co.uk/archlinux/$repo/os/$arch
#Server = http://mirrors.manchester.m247.com/arch-linux/$repo/os/$arch
#Server = http://www.mirrorservice.org/sites/ftp.archlinux.org/$repo/os/$arch
#Server = https://www.mirrorservice.org/sites/ftp.archlinux.org/$repo/os/$arch
#Server = http://mirror.netweaver.uk/archlinux/$repo/os/$arch
#Server = https://mirror.netweaver.uk/archlinux/$repo/os/$arch
#Server = http://arch.serverspace.co.uk/arch/$repo/os/$arch
#Server = http://archlinux.mirrors.uk2.net/$repo/os/$arch
#Server = http://mirrors.ukfast.co.uk/sites/archlinux.org/$repo/os/$arch
#Server = https://mirrors.ukfast.co.uk/sites/archlinux.org/$repo/os/$arch
Make sure to uncomment the ones you want to use, otherwise you will receive an error that no servers are reachable when trying to install Arch.
Create a backup of the original list with following command:
mv /etc/pacman.d/mirrorlist /etc/pacman.d/mirrorlist.bk
Then create a new file and paste your mirrors list into it:
nano /etc/pacman.d/mirrorlist
More info about mirrors: https://wiki.archlinux.org/index.php/Mirrors
Install base package
Now it is time to download and install the Arch OS files and some basic packages like pacman, bash, etc
pacstrap /mnt base base-devel openssh
This will install base and base-devel package group as well as openssh.
If you want to install other packages you can add them on the end of that command separated by a space, such as desktop envronemtn
More info about package groups: https://wiki.archlinux.org/index.php/Package_group and full package groups available to install https://www.archlinux.org/groups/
Create file systems table (fstab file)
You need to create an fstab file for the currently mounted partitions, so when the Arch starts it knows which partitions to mount. Otherwise you won’t be able to boot your system.
Below command will generate the fstab file including UUID of each partition and redirect it to /mnt/etc/fstab in the Arch install.
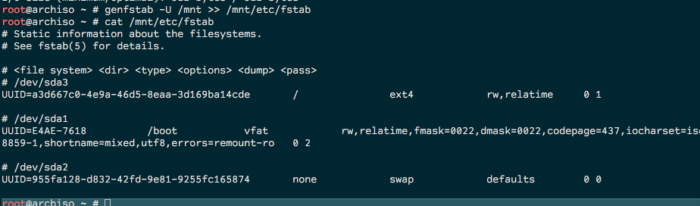
genfstab -U /mnt >> /mnt/etc/fstab
You can then check if the file was generated succesfully:
cat /mnt/etc/fstab
You should see output similar to below with ‘/’, ‘/boot’ and ‘swap’ partition listed
Change root directory into your new Arch install
arch-chroot /mnt
This will allow you to further modify settings on your installation before starting it up.
Set time zone
ln -sf /usr/share/zoneinfo/Europe/London /etc/localtime
hwclock --systohc
Uncomment ‘en_GB.UTF-8 UTF-8’ or other locale you need in:
/etc/locale.gen
run below to generate locale for your system
locale-gen
Set your language variable in:
nano /etc/locale.conf
-------------------------
LANG=en_GB.UTF-8
Set persistent keymap:
nano /etc/vconsole.conf
-------------------------
KEYMAP=uk
Install bootloader
I picked systemd-boot for my bootloader, because it’s much simpler compared to grub. It’s already part of Arch system by default, supports drop-in file configuration (separate .conf file for each kernel or operating system), very robust, fast and in my opinion simpler to setup. It has it’s limitation compared to grub, but it works perfectly in my VM scenario.
More info about bootctl: https://wiki.archlinux.org/index.php/Systemd-boot
To install simply type following command:
bootctl install
Configuration of boot loader:
nano /boot/loader/loader.conf
-------------------------------
default arch
timeout 4
editor no
Now we need to configure entry for Arch by first finding PARTUUID for the root partition, in my case /dev/sda3
blkid -s PARTUUID -o value /dev/sda3
Outputs: 8ca1c9d2-9fb2-d34d-966c-dd84f2b1f0e9
You can copy basic config file from bootctl directory:
cp /usr/share/systemd/bootctl/arch.conf /boot/loader/entries/
Then edit it supplying above PARTUUID value
nano /boot/loader/entries/arch.conf
------------------------------------
title Arch Linux
linux /vmlinux-linux
initrd /initramfs-linux.img
options root=PARTUUID=8ca1c9d2-9fb2-d34d-966c-dd84f2b1f0e9 rw
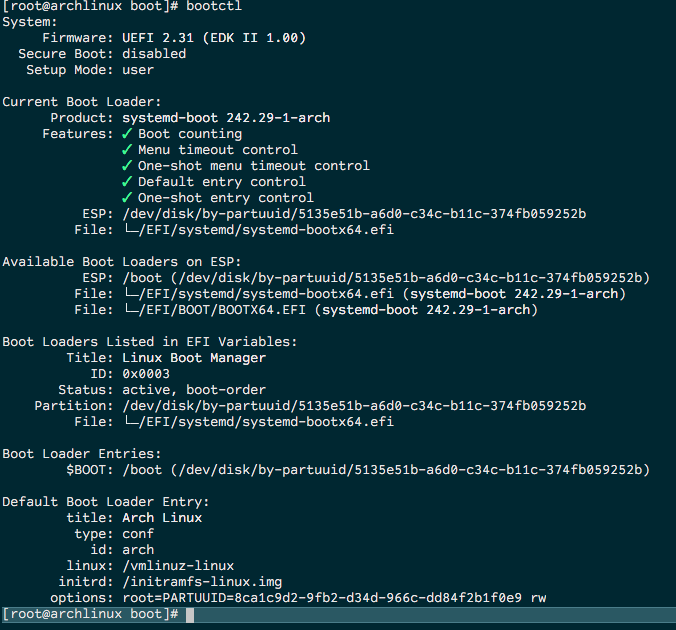
Save the file. Update bootloader and check status.
bootctl update
bootctl status
This will produce an output with all the info.
Couple of other notes
If you installed OpenSSH you may want to configure it now for easier access later. Same thing applies for creating other users or installing additional package like graphical user interface, etc.
I will not go through these details, as that’s outside of the scope of this guide.
Reboot and enjoy!
That’s it. Type ‘Exit‘ to get back to your Live CD and then ‘reboot’ to restart and boot into Arch!
Post-Install Notes
Unable to get back into your install via SSH after install
Upon first connection to the live install via ssh, your computer might have saved ssh key into known_hosts ssh file linked with the IP address of the VM. This happened on the MacOS I was using for this install. Since I installed ssh server package on Arch, the RSA key has changed and when I was trying to connect my system warned me about it:

To fix it, all I had to do was edit known hosts file and delete the old key for the server:
nano ~/.ssh/known_hosts
At this point I was able to re-connect again and continue customization of Arch!
More Arch coming soon!